Junction boxes are used to connect multiple electrical cables together and serve as distribution points for the circuits.
Here are some additional pieces of information regarding the correct wiring of junction boxes:
- Choosing the right junction box: Select the junction box according to the environmental conditions, for example, surface-mounted for damp environments or flush-mounted for regular living spaces. Also, pay attention to the required size of the junction box to have enough space for the connections.
- Preparing the cables: Cut the electrical cables to the required length and remove the outer insulation material to expose the inner conductors. Ensure that the cables are long enough to be comfortably inserted into the junction box and connected to the terminals.
- Connecting the cables: Use the fixed terminal blocks or insulated individual clamps present in the junction box to make connections between the conductors. Ensure that the connections are secure to guarantee a good electrical connection. Consider the specific connection options of each terminal, such as screw terminals or push-in terminals, and use the appropriate tools.
- Checking the connections: Carefully inspect the connections to ensure that there are no loose wires and that the insulation has been properly carried out. Perform continuity testing as necessary to verify that the connections are functioning correctly.
- Finishing work: Once the wiring is completed, you can install the junction box into the wall or ceiling and securely fasten it. Ensure that the junction box is correctly installed and complies with local regulations.
It is crucial to adhere to applicable safety standards and regulations when wiring junction boxes. If you are uncertain or have no experience with electrical installations, I recommend consulting a qualified electrician to perform the work. Electrical installations require expertise and should only be carried out by trained personnel to ensure safety.
Choosing and Using the Right Junction Box:
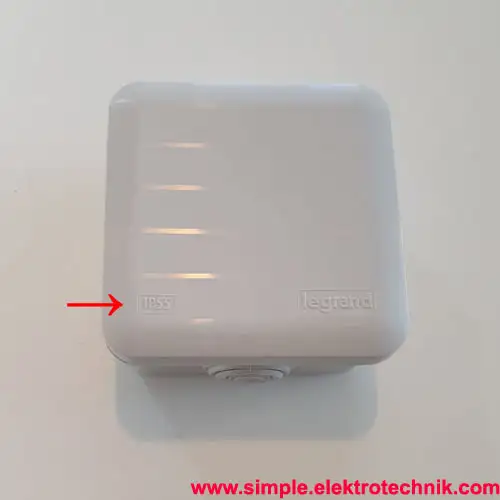
This surface-mounted junction box complies with IP55 protection, which means it is dust-tight and provides complete protection against contact and protection against water jets from all directions.
To ensure the IP protection, it is essential to firmly screw the junction box at the designated fixing points. Additionally, there is a protective cap for the screws, initially placed loosely inside the junction box. After fixing, this protective cap must be placed over the screws.
During installation, ensure that the cable entries are only opened as far as needed, so they fit precisely with the cable sheath afterward. This ensures that the IP protection of the junction box remains intact and prevents moisture from entering.
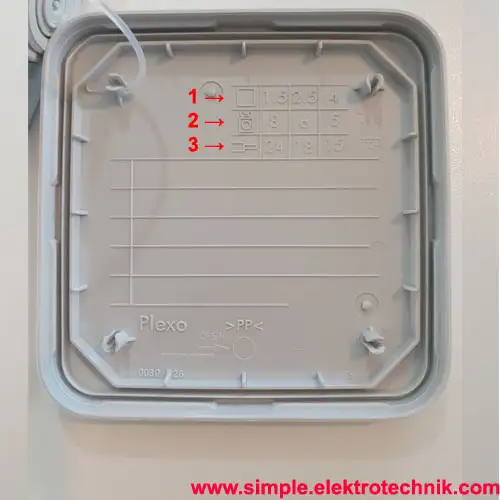
In this illustration, the capacities of this junction box are shown:
1. Permissible cable cross-sections:
The junction box is designed for specific cable cross-sections, which are indicated in the technical data or user manual. This includes cross-sections from 0.5 mm² to 6 mm².
2. Permissible number of terminals depending on the cable cross-section:
The number of permissible terminals depends on the cable cross-section used. More detailed information on this can also be found in the technical specifications.
3. Maximum permissible number of cables depending on the cable cross-section:
It is essential to consider the maximum number of cables that can be inserted into the junction box, depending on the cable cross-section. This information should be available in the manufacturer's instructions.
Inserting Cables and Wiring the Junction Box:
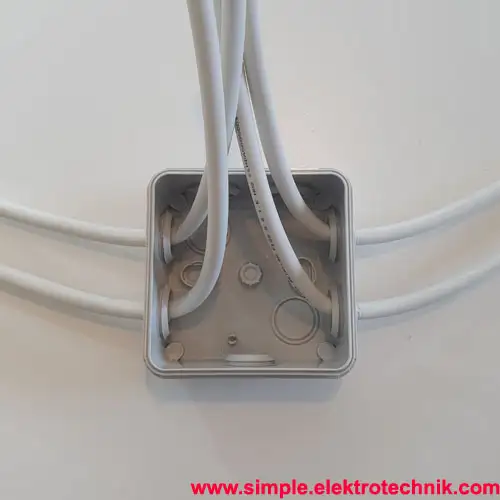
First, all cables must be inserted into the junction box. For this, it is recommended to carefully pierce the cable entries with a suitable tool, such as a screwdriver of the appropriate size.
Choose the size of the hole so that it fits precisely with the cable, ensuring IP protection against the ingress of foreign objects and moisture.
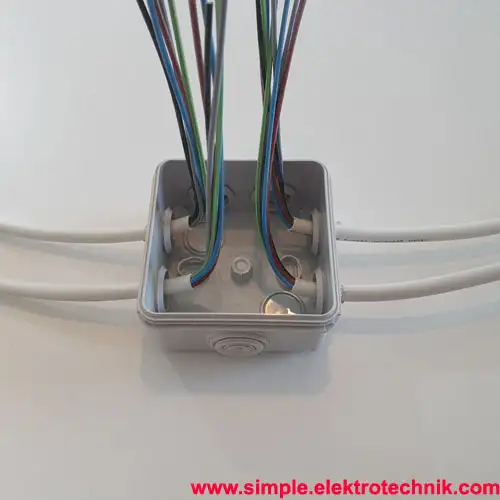
After inserting the cables, the cable sheath must be removed.
Make sure that the cable sheath does not protrude too far into the junction box, as this can make wiring difficult due to lack of space.
Subsequently, carefully straighten the individual wires of the cables. This will create a clean and organized wiring.
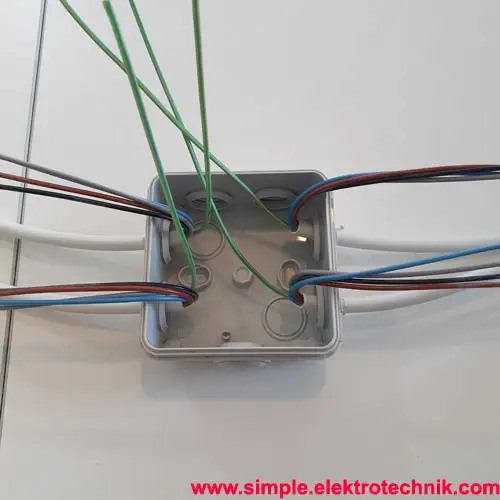
When wiring, start with the protective conductor, which is connected in the left area of the junction box. Next comes the neutral conductor, followed by the phase conductors L1, L2, L3. The protective conductor wires are carefully led to the left side of the junction box behind all other wires to ensure a neat and interference-free wiring.
Ensure that the wires are routed to create a reserve bend, making handling easier. This reserve bend can be guided from right to left or from top to bottom. It is essential for the cable routing to be clean and straight to have a clear overview and to detect possible errors more easily. A well-organized and orderly wiring also facilitates future maintenance work and enables efficient fault diagnosis.
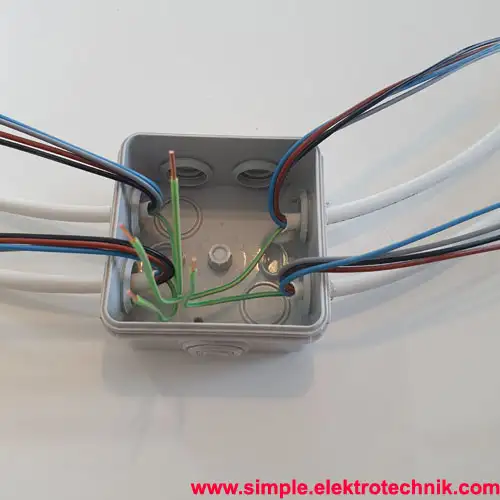
After holding all the wires, they should be cut to the same length using side cutters or cable shears. The ends of the wires should be approximately 2 cm from the top edge of the junction box to leave enough space for the terminals.
Subsequently, the wires need to be stripped. The stripping should be of the same length for all wires, depending on the type of terminal (e.g., for Wago terminals, 11 mm).
It is essential to use a suitable wire stripping tool to ensure that the wires are not excessively scratched or damaged. Otherwise, wire breakage could occur. Careful stripping ensures a secure and reliable connection of the wires with the terminals.
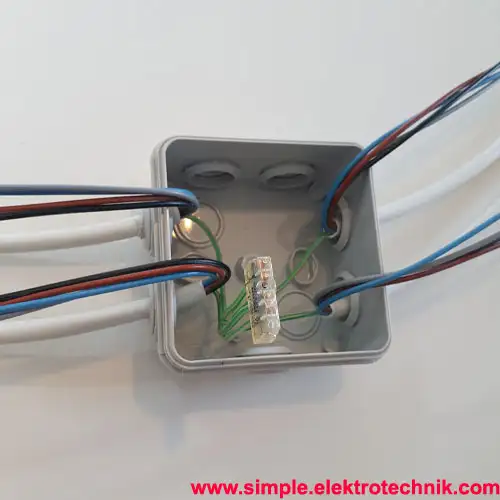
Now, the wires are connected with the (in this case) push-in terminal. The push-in terminal has the advantage of being half-transparent, making it easier to check the connection.
When connecting the wires to the push-in terminal, it is important to ensure that all wires are fully and firmly inserted into the terminal to ensure a secure and reliable connection.
The transparent nature of the terminal allows for easier detection and correction of any errors or incomplete connections before closing the junction box. This contributes to an overall reliable and well-wired installation.
Completion and Inspection of the Wired Junction Box:
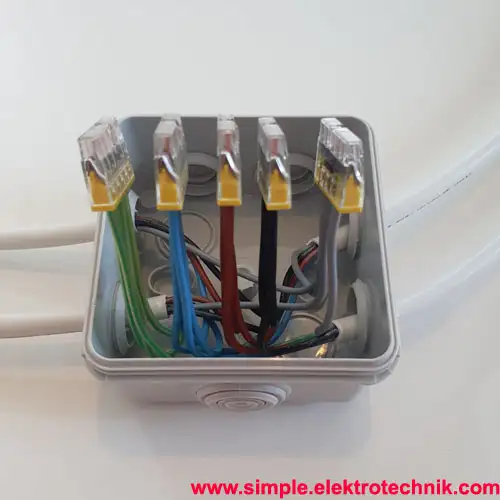
After the first wire connection has been successfully made and verified with the push-in terminal, the same principle is applied to the other wires.
Each wire is securely and neatly inserted into the push-in terminal according to the number of available terminals and the requirements of the cabling, and the connections are carefully rechecked.
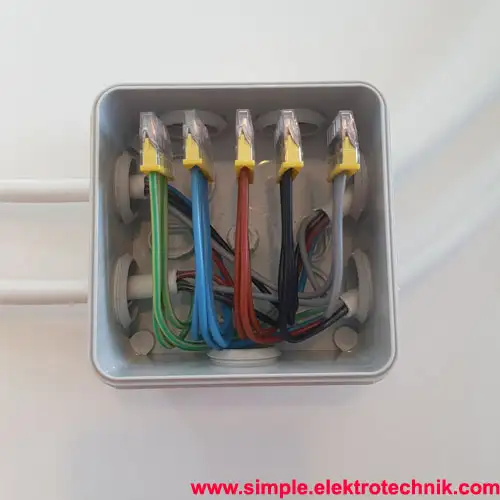
After the wires have been cleanly and neatly wired in the junction box, they can be carefully bent into the desired position. A final check should be performed to ensure that all connections are correct and secure.
If everything is in order, the junction box can now be confidently closed. It is advisable to carefully seal the box to protect the connections and wiring from external influences and potential hazards.
Through meticulous wiring and the final inspection, the safety and functionality of the electrical installation are ensured, and any possible issues or errors can be detected and rectified in a timely manner.
"Summary: Proper Insertion and Wiring of the Junction Box"
In this guide, we have covered step-by-step the correct selection, installation, and wiring of a junction box. We emphasized the importance of the protection class, for example, IP55, to ensure a safe installation. The attachment of the junction box to the designated mounting points and the use of the protective cap for the screws were also highlighted.
When inserting the cables, we ensured to choose suitable cable entries to maintain the IP protection. The cable sheath was stripped, and the wires were bent neatly and straight to allow for an organized wiring.
The wiring started with the protective conductor and continued step by step with the other wires. We emphasized the importance of correctly inserting the wires into the transparent push-in terminal and rechecking the connections afterward.
Finally, we highlighted the significance of careful inspection, bending the wires into the desired position before securely closing the junction box.
A properly wired junction box not only ensures a reliable electrical installation but also enables easy maintenance and fault diagnosis. By following this guide, you can ensure a safe and well-functioning electrical installation.
Elektrosicherheit: Richtlinien und Vorsichtsmaßnahmen für einfache elektrotechnische Arbeiten
Die Sicherheit hat oberste Priorität.

- Alle hier bereitgestellten Anleitungen und Informationen dienen rein informativen Zwecken und sollen ausschließlich zur Informationsbeschaffung und Weiterbildung verwendet werden. Sie sollten nicht als Ersatz für professionelle Beratung angesehen werden. Bei Zweifeln empfiehlt es sich, einen qualifizierten Elektriker hinzuzuziehen, um fachkundige Unterstützung zu erhalten.
- Es ist wichtig, die örtlichen Vorschriften und Bestimmungen bei elektrischen Arbeiten zu beachten. Arbeiten mit Strom sollten nur von qualifizierten Fachleuten durchgeführt werden, da sie lebensgefährlich sein können.
- Fehler in Anleitungen und Schaltbildern sind möglich. Der Anbieter übernimmt keine Gewähr oder Haftung für Schäden oder Verletzungen, die aus der Umsetzung der bereitgestellten Informationen resultieren könnten. Es liegt in Ihrer Verantwortung, die Richtigkeit der Informationen zu überprüfen und die erforderlichen Sicherheitsvorkehrungen zu treffen.
- Die Verwendung geeigneter persönlicher Schutzausrüstung (PSA) ist entscheidend, um die Sicherheit bei elektrotechnischen Arbeiten zu gewährleisten. PSA schützt vor Stromschlägen, Augenverletzungen, thermischen und mechanischen Gefahren. Es ist jedoch wichtig zu beachten, dass PSA allein nicht ausreicht und durch Fachwissen, Fähigkeiten und die Einhaltung von Sicherheitsvorschriften ergänzt werden muss.
- Arbeiten an Teilen, die unter Spannung stehen, sind strengstens untersagt. Vor Beginn der Arbeiten müssen geeignete Sicherheitsvorkehrungen getroffen werden, einschließlich des Freischaltens der Anlage.
- Bei Schäden durch mangelhafte Elektroinstallation haftet der Errichter der Anlage gemäß den geltenden gesetzlichen Bestimmungen.
- Diese Zusammenfassung von Richtlinien und Vorsichtsmaßnahmen ist nicht umfassend. Bei Unsicherheiten ist es ratsam, einen qualifizierten Elektriker zu konsultieren oder sich an örtliche Vorschriften und Bestimmungen zu halten, um maximale Sicherheit zu gewährleisten.
- Die ordnungsgemäße Installation und Wartung von elektrischen Anlagen und Geräten ist von großer Bedeutung, um mögliche Gefahren zu minimieren und ein sicheres Umfeld zu schaffen.